
Maternity Bra Measurement: Achieve the Ideal Fit Easily
Over 60 percent of women end up wearing the wrong bra size during pregnancy. The right maternity bra brings daily comfort and proper support while your body changes. Learning how to measure for a maternity bra at home saves you frustration in the fitting room and helps you avoid painful sizing mistakes. This guide walks you through every simple step so you can find your true fit and feel confident throughout your pregnancy journey.
Table of Contents
- Step 1: Gather The Essentials For Accurate Measurement
- Step 2: Wear The Right Clothing For Correct Sizing
- Step 3: Determine Your Band Size Precisely
- Step 4: Measure Your Bust To Find Cup Size
- Step 5: Verify Your Measurements With A Fit Check
Quick Summary
| Key Point | Explanation |
|---|---|
| 1. Measure Under the Bust Accurately | Use a snug measuring tape under your bust to determine your band size. Ensure it is horizontal and not too tight for an accurate fit. |
| 2. Consider Clothing for Measurements | Wear a non-padded or minimal fitting bra to avoid distortions in your breast measurements. This gives a truer size representation. |
| 3. Take Multiple Measurements Daily | Measure your bust size at different times to account for size fluctuations due to hormonal changes during pregnancy. |
| 4. Test Bra Fit Through Movement | After trying on a maternity bra, check its comfort by raising arms and bending. Ensure it remains supportive without shifting. |
| 5. Round Band Size to Even Numbers | If your band measurement is odd, round up to the nearest even number for a more comfortable fit, essential for maternity bras. |
Step 1: Gather the Essentials for Accurate Measurement
Preparing for your maternity bra measurement requires some simple tools and a strategic approach. You will need a soft measuring tape, a mirror, and about 5 minutes of uninterrupted time to get precise results.
According to Medela, the key is maintaining a relaxed posture while measuring. Start by finding a soft measuring tape preferably with clear markings. Wrap the tape comfortably around your ribcage just underneath your bust line, keeping the tape snug but not tight. Take a deep breath and note the measurement while standing naturally.
A pro tip many women overlook is measuring at different times during the day. Breast size can fluctuate with hormonal changes and hydration levels, so consider taking measurements in the morning and evening for the most accurate range. This helps ensure you choose a bra that provides comfort throughout your pregnancy journey.
Ready to move forward? Your next step will involve translating these measurements into the perfect maternity bra size that supports you during this incredible time.
Step 2: Wear the Right Clothing for Correct Sizing
Preparing for an accurate maternity bra measurement means choosing your clothing strategically. Your goal is to minimize any interference that could distort your true breast size and shape.
According to Medela, the ideal approach is wearing a well-fitting non-padded bra or no bra at all during measurement. This ensures you capture your natural breast dimensions without any artificial enhancement or compression. Remove any bulky clothing or layers that might add extra volume or create measurement challenges.
A helpful strategy is to stand in front of a mirror wearing a thin fitted tank top or a comfortable bralette. This allows you to see the positioning of the measuring tape and helps you maintain proper posture. Avoid wearing sports bras or heavily structured undergarments that can reshape your natural contours or compress breast tissue.
With your clothing properly selected, you are now ready to proceed to the precise measurement technique that will help you find your perfect maternity bra size.
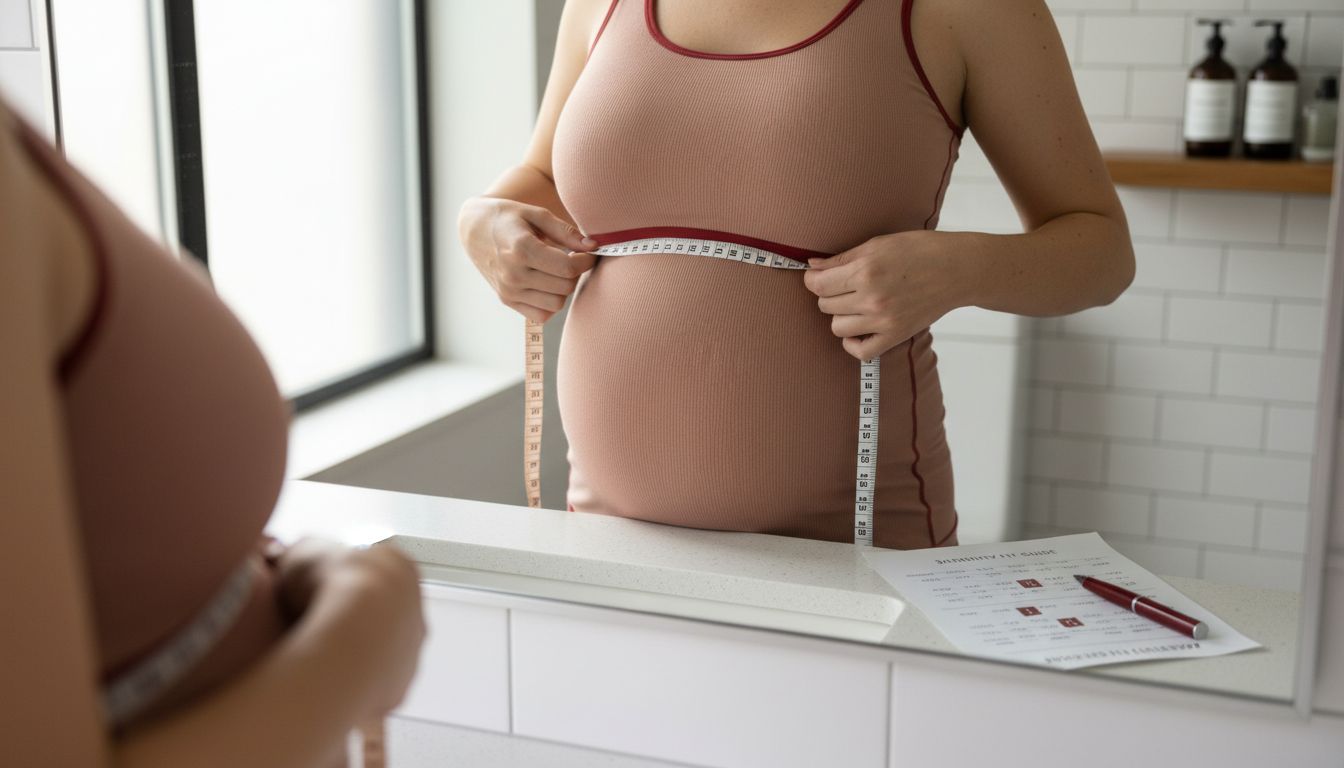
Step 3: Determine Your Band Size Precisely
Measuring your band size is a critical step in finding your perfect maternity bra. This measurement provides the foundational support for your entire bra fitting process.
According to Medela, the key is to measure around the ribcage just under the bust with precision. Wrap the measuring tape snugly around your body keeping it completely level and parallel to the ground. Make sure the tape is comfortably firm but not compressing your body. Take a deep breath and note the exact measurement.
Tips for accuracy include standing straight with your arms relaxed at your sides and ensuring the measuring tape remains horizontal all the way around your body. If your measurement falls on an odd number round to the nearest even number. For instance if you measure 31 inches round to 32. This slight adjustment helps ensure a more comfortable and supportive fit.
You are now ready to move on to the next crucial step of determining your cup size which will complete your comprehensive maternity bra measurement journey.
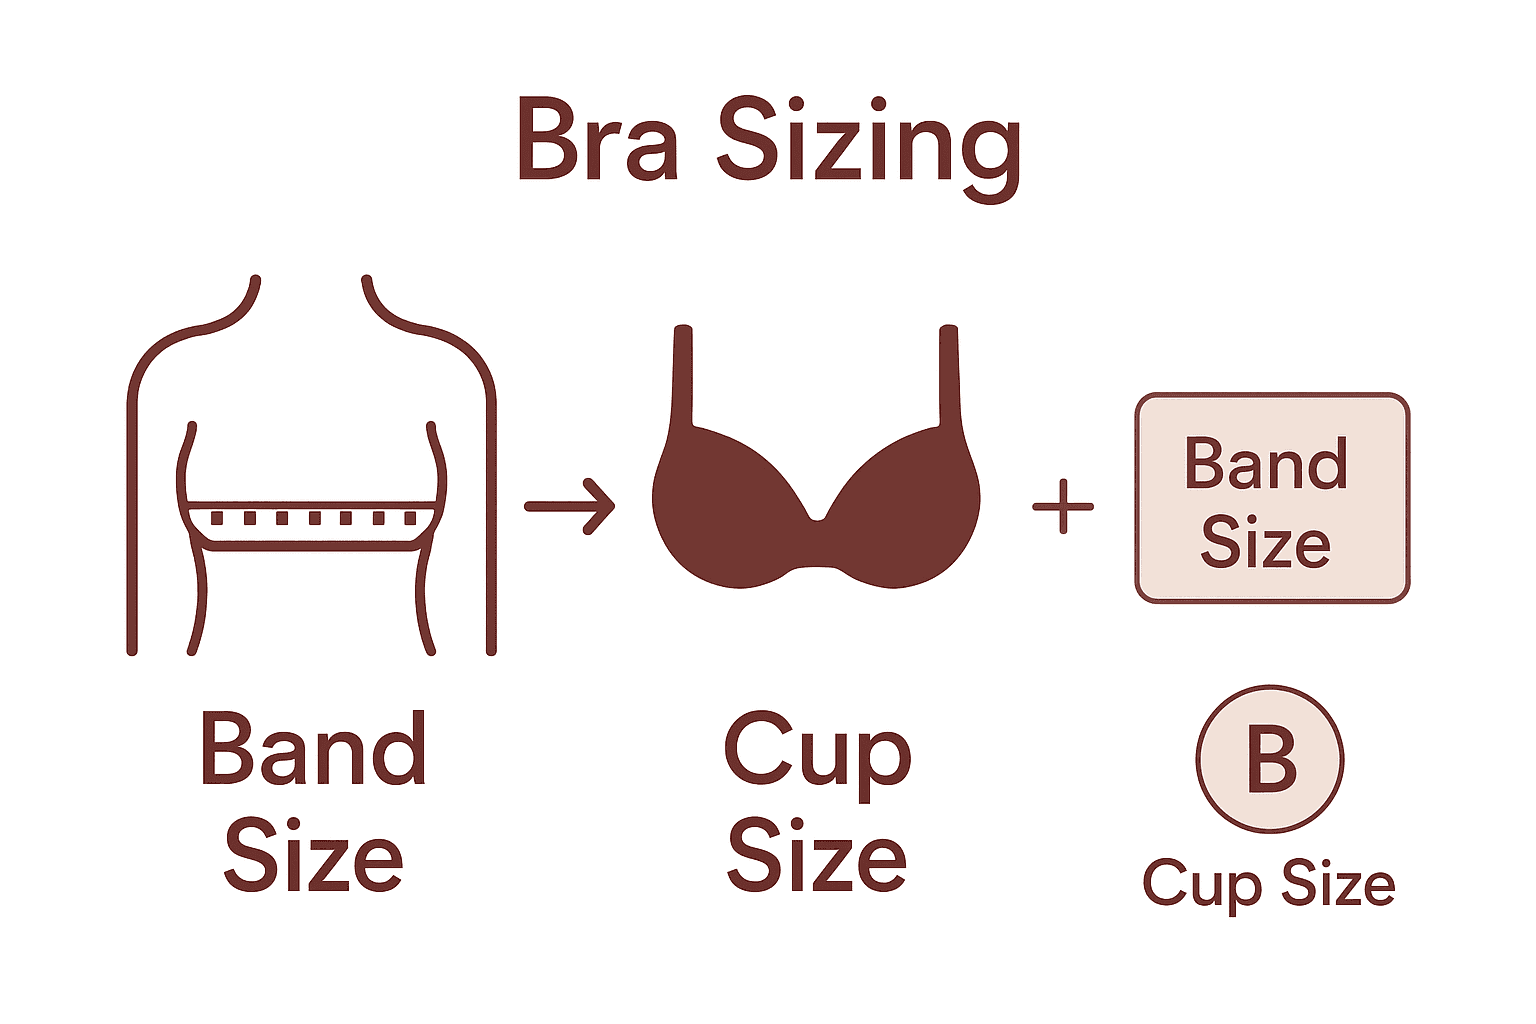
Step 4: Measure Your Bust to Find Cup Size
Determining your cup size is the final piece of your perfect maternity bra measurement puzzle. This step helps you understand how your breast size translates into a precise bra fit.
According to Medela, calculating your cup size involves measuring around the fullest part of your bust and then comparing this measurement to your previously determined band size. Wrap the measuring tape around your chest at the fullest point while standing straight. Make sure the tape is level and not too tight or too loose.
The cup size calculation is simple. Subtract your band measurement from your bust measurement. Each inch of difference represents a cup size increment. For example if your band measurement is 34 inches and your bust measurement is 36 inches 2 inches represents a B cup. Remember that pregnancy can cause significant breast changes so measuring multiple times throughout your pregnancy ensures you always have the most comfortable and supportive fit.
With your band and cup measurements complete you are now equipped to select a maternity bra that will provide the comfort and support you need during this transformative time.
Step 5: Verify Your Measurements with a Fit Check
The final stage of finding your perfect maternity bra involves confirming that your carefully taken measurements translate into actual comfort and support. This verification process ensures your bra will feel great throughout your pregnancy.
According to Medela, the fit check involves several key elements. When trying on a bra pay attention to how the band sits on your body. It should rest horizontally and feel snug without digging into your skin. The cups should completely encapsulate your breasts without any gaping or overflow. Your breast tissue should sit smoothly inside the cup without bulging or creating extra space.
A crucial tip is to perform movement tests while wearing the bra. Raise your arms stretch sideways and bend forward to ensure the bra maintains its position and provides consistent support. The straps should remain in place without sliding off your shoulders or creating uncomfortable pressure points. If the bra shifts significantly or feels uncomfortable during these movements its time to try a different size or style.
With this thorough fit check complete you are now ready to confidently select a maternity bra that will support you through your pregnancy journey.
Find Your Perfect Maternity Bra Fit Today
Measuring your maternity bra size can feel confusing and uncomfortable as your body changes throughout pregnancy. The challenge lies in getting a precise band size and cup measurement that truly supports your needs during this special time. If you want to avoid bras that pinch, slip, or fail to offer the right coverage, it is essential to choose maternity bras designed with your fluctuating shape in mind.
Experience the comfort and confidence of bras made for you by exploring our Sports / Maternity Collection at Leverage On Heroes Women Store.

Don’t settle for generic fits that add stress. Act now and discover bras crafted to support your body precisely. Visit our home page or browse specialized styles like our Push-Up Bras to find the maternity support you deserve. Find your ideal fit today at LeverageOnHeroesWomen.com and make comfort your top priority throughout your pregnancy journey.
Frequently Asked Questions
How do I start measuring for a maternity bra?
To begin measuring for a maternity bra, gather a soft measuring tape and find a mirror. First, measure around your ribcage just under your bust while maintaining a relaxed posture. Note this measurement and ensure it’s done snugly, but not tightly.
When is the best time to take my maternity bra measurements?
It’s best to measure both in the morning and in the evening. Breast size can fluctuate throughout the day due to hormonal changes and hydration levels, so multiple measurements will give you a more accurate range.
What should I wear when measuring for my maternity bra?
Wear a well-fitting non-padded bra or no bra at all to ensure accurate measurements. Remove any bulky clothes that might add volume and try to stand in a fitted tank top to maintain comfort and clarity during the measurement process.
How do I calculate my cup size after measuring?
To determine your cup size, measure around the fullest part of your bust and subtract your band size measurement from this bust measurement. For every inch of difference, it typically represents one cup size increment (e.g., a 2-inch difference indicates a B cup).
What should I check for during a maternity bra fit test?
During a fit test, make sure the band lies horizontally without digging into your skin and cups encapsulate your breasts comfortably with no gaping. Additionally, perform movement tests like raising your arms and bending forward to ensure the bra stays in place and provides the necessary support.
How can I ensure my maternity bra provides ongoing comfort?
Regularly reassess your measurements throughout your pregnancy, as breast size can change significantly. Make adjustments to your bra size as needed to ensure it continues to offer optimal comfort and support during your journey.
Recommended
- Plus Size Nursing Bra | Comfortable Maternity Underwear – Leverage On Heroes Women Store
- Maternity Nursing Bra | Big Cup with Extenders for Moms – Leverage On Heroes Women Store
- Front Button Nursing Bra | Anti-Sagging Maternity Support – Leverage On Heroes Women Store
- Adjustable Nursing Maternity Bra | Anti-Sagging Breastfeeding Support – Leverage On Heroes Women Store